|
The tutorial is written with PSP X 9 but can also be done with other versions.
to retrieve the material click on the parrot

------
SAINT PATRICKS'DAYS
-----
filtre
Unlimited 2 - Medhi -------
The end result may be slightly different if you work with a different version of PSP.
The translation is written with PSP X 9.
If this tutorial looks like another, it's pure coincidence.
I received Alyciane's permission to translate her tutorials.
Alyciane thank you for allowing me to translate your beautiful tutorials.
I have permission to translate the tutorials
Garances thank you for allowing me to translate your beautiful tutorials.
Matérial :
1 image on Saint Patrick’s day for the bottom
Different tubes on the same subject (4 or 5)
1 mask
1 wordart
Filters :
Filter Ulimited 2 (Noise Filter)
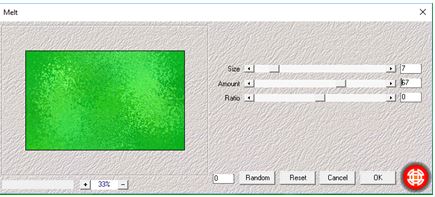
Medhi (Melt)
If you are ready, we start :
Open one new transparent raster 800x500
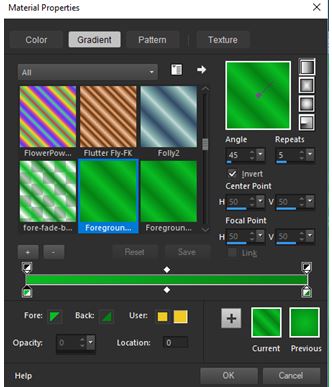
Prepare one halo gradient
Foreground #0cbx23 Background #068115 or your color
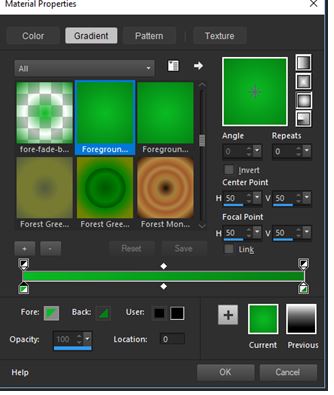
Fill you image with this gradient
Effects/Image effects/Seamless tiling/Default

Adjust/Blur/Gaussian blur (50)
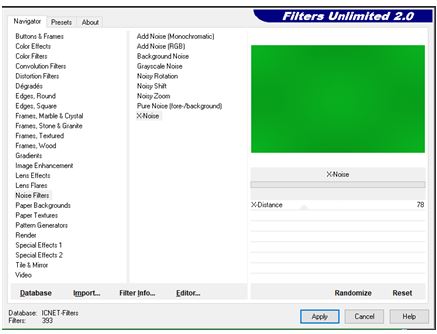
Effects/Plugins/Filter Ulimited 2/Noises Filters/X noise (177)
Open the picture 684559 or yours
Copy it
Layer/New raster layer
Selections/Select all
Paste your picture into the selection
Selections/Select none
Blend Mode : screen, opacity 48
Layer/New raster layer
Fill with color white #ffffff
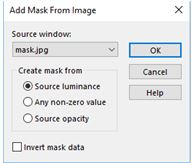
Open the mask.jpg and minimize it
Layer/New mask layer/from image
Layers/Merge/Merge group
Blend Mode : Luminance (Legacy), opacity 50
Open Image 10 and paste it as new layer
Do the same for the images 12, 14, 15 and 16
Check that everything is in place as you wish
Layers/Merge/Merge visible
Image/add one border of 1 of the light color
Image/add one border of 1 of the dark color
Add one border of 20 white color
Select it with the magic wand and paste in the selection the image in memory
Adjust/Blur/Gaussian blur (10)
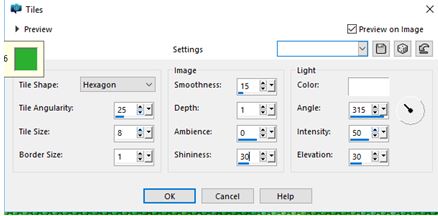
Effects/Texture effects/Tiles (25/8/1/15/1/0/30 white 315/50/30)
Invert select
Effects/Effects 3D/Drop shadow (0/0/80/50)
Repeat once
Select/Select none
Image/add one border of 1 of the dark color
Image/add one border of 1 of the light color
Image/add one border of 1 of the dark color
Add one border of 30 white color
Select it with the magic wand
Fill it with the first gradient but with this configuration
Effects/Plugin/Medhi/Melt 7/67/0
Effects/Effects 3D/Drop shadow in memory
Selection/Select none
Image/add one border of 1 of the dark color
Image/add one border of 1 of the light color
Sign. Resize to 900.
I hope you enjoy this tutorial.
Garances le 05/03/2018
RETOUR AU MENU

|