|
Tutoriel fait avec PSP 2018
https://ahp.li/c8c6bfca96944b47adaa.rarTo retrieve the material click on the parrot

------
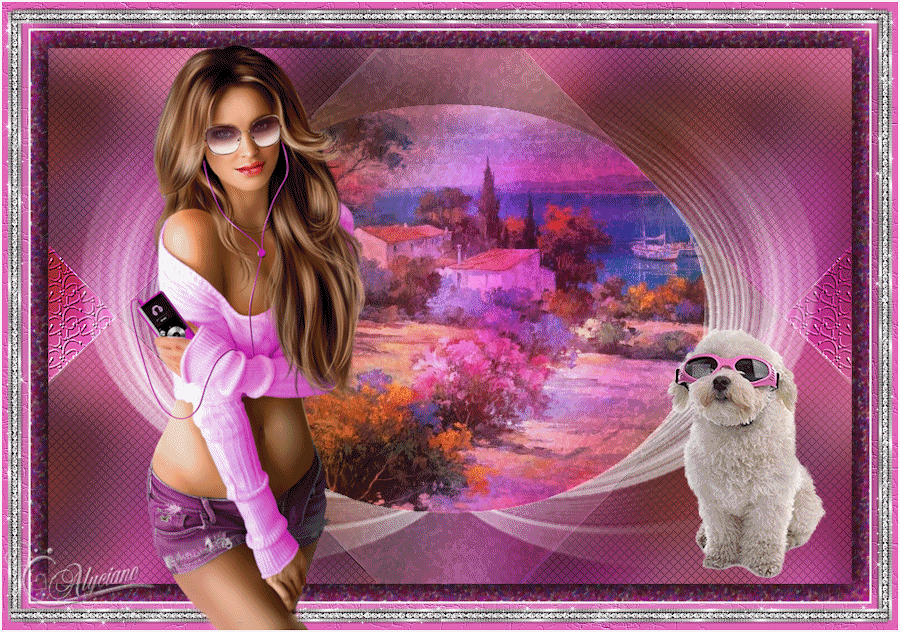
I AM BEAUTIFUL WITH GLASSES
The tutorial is written with PSP 2018 but can also be done with other versions.
-----
Matérial
You need at your choice
1 woman with glasses
1 tube misted
1 background
Decoration tubes
1 Texture
1 mask (in the material)
1 alpha picture
Filters
Filter Alien Skin Snap Art/Pointilism
Simple/Top Left Mirror and Diamonds
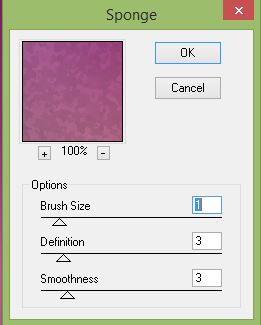
Artistic/Sponge or Artistiques/Eponge
Filter Alien Skin Xenofex 2/Constellation
AP01/Lines/Silverlining
Logiciel Animation Shop
-----
If you are ready we start :
Open image alpha glasses, duplicate and close the original
Choose two colors one light color in the foreground for me #d95eae and one dark color in the background for me #822a67
Selections/Select all
Open background image
Edit/Copy
Edit/Paste into the selection
Selections/select none
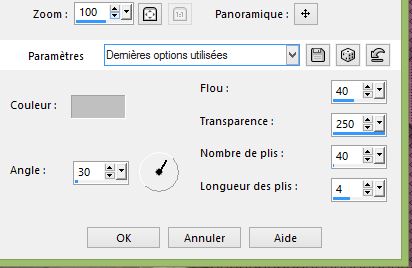
Adjust/Blur/Gaussian Blur (30)
Effects/Plugins/Simple/Diamonds
Effects/Edge effects/Enhance
Selections/Load save selection/Load selection from alpha channel/Selection 1
Selections/Promote selection to layer
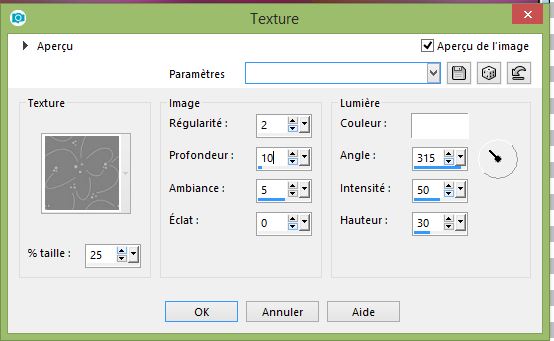
Effects/Texture effects/Texture
Adjust/Sharp/Sharpness
Layers/Properties/Blend mode : Hard Light and opacity 100
Selections/Select none
Layers/Duplicate
Image/Mirror/Mirror Horizontal
Layers/Merge/Merge down
Position you on raster 1
Selections/Load save selection/Load selection from alpha channel/Selection 2
Selections/Promote selection to layer
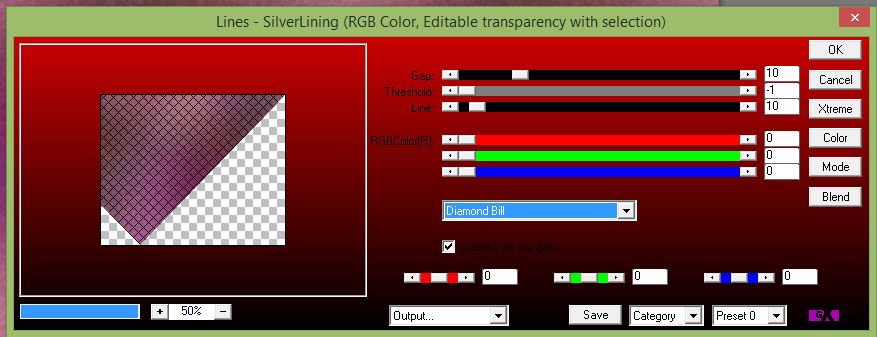
Effects/Plugins/AP01/Lines/Silverlining/Diamond Bill
Layers/Properties/Blend mode : Overlay and opacity 55
Selections/Select none
Effects/Plugins/Simple/Top Left Mirror
Position you on raster 1
Selections/Load save selection/Load selection from alpha channel/Selection 4
Selections/Promote selection to layer
Effects/Plugins/Artistic/Sponge (or Artistiques/Eponge)
Adjust/Sharp/Sharpness
Sélections/Select none
Position you at the top layers
Layers/New raster layer
Fill with white color
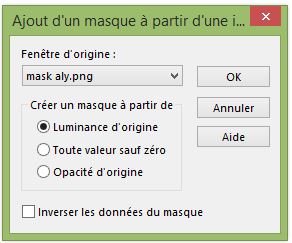
Open the "Mask Aly" minimize it
Layers/New Mask Layer/From image
Layers/Merge/Merge group
Effects/Edge effects/Enhance
Objects/Align/Center in Canvas
If you have not this option, put the mask like below
Position you on promoted selection 1
Selections/Load save selection/Load selection from alpha channel/Selection 3
Press the delete key (keep the selection)
Do the same on promoted selection 2
Layers/New raster layer
Open your misted and paste it into selection
Selection/Select none
Depending on your misted, paste as a new layer, invert , delete and select none
Layers/Properties/Blend mode : Overlay or other as it agrees you
Layers/Merge/Visible merge
Selections/Select all
Image/Add borders/20 dark color
Selections/Invert
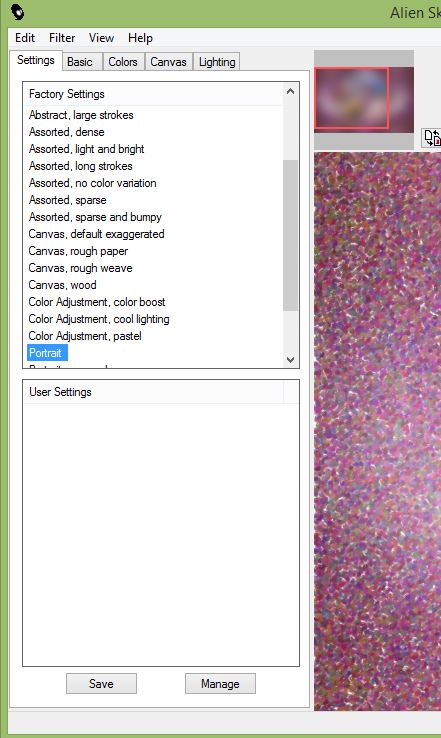
Effects/Plugins/Alien Skin Snap Art/Pointilism
Preset : Portrait with these parameters
Selections/Invert
Effects/Effects 3D/Drop Shadow (5/5/70/40 black)
Remake in negative H : -5 and V : -5
Selections/Select none
Image/Add borders/2 white
Image/Add borders/30 light color
Select this border
Effects/Texture effects/Fine Leather
Paste your main tube and your deco
Image/Add borders/2 white
Image/Resize to 900
Put signature
Past/deco tube if you do not do the animation, and erase the deco on who's on your tubes
save in JPEG
Animation
Open Animation Shop
On your work PSP
Effects/Plugins/Alien Skin Xenofex 2/Constellation
Click on the settings tab and check "Glimmer"
after 3/25/1/0/100/75 and keep original image
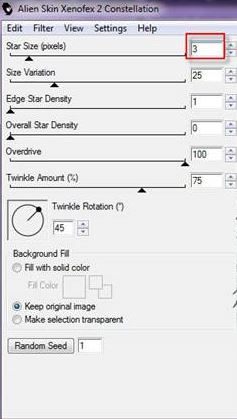 ok ok
Edit/Copy special/Copy merged
In Animation Shop paste as a new animation
**Return to PSP
Cancel "Constellation" and in the plugin "Constellation" click only on Random Seed
Edit/Copy special/Copy merged
In Animation Shop paste after active image**
Redo from **to** twice
Save in GIF
Here it is, I hope that the realization of this tag has pleased you
Thanks you for having realizing
Thanks to Garances who checks my all tutorials
Garances 26/05/2018
RETOUR AU MENU
|